Automatic Speech Recognition as a Microservice on AWS

This article will help you set up your own ASR Pipeline using Kaldi Toolkit on AWS Infrastructure, giving you the option of scaling and High Availability.
This article assumes the reader has the necessary awareness around cloud computing and related terms, moreover, any practical experience can help you get everything done in under an hour!
Before I start with the instruction manual of setting up this pipeline, let’s go through the three essential questions
What does the tool do?
In a nutshell, a user would upload any English audio file, and the tool will provide the transcription for the same and store into a Database which then can be used for various use-cases
Why build this tool?
For someone who’s business revolves around audio/conversations in the form of audio, building such a tool will not only open an endless pool of possibilities in terms of analytics on text but also enable one to develop their own self-serving product.
And mind you, there are very few in the space of speech-to-text!
Heads Up
This tool makes use of Kaldi’s Pre-Trained Neural Network English model for transcription to text. While the vocabulary of the model is quite vast, but still may not be enough to pick very rare/specific words for your use-case.

Is it possible to
Yes, It is an open-source project. Feel free to contact me if you need help in customizing it
The Architecture
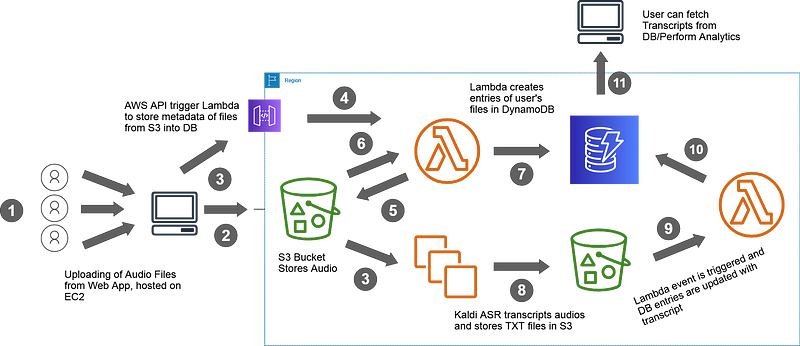
Enough with the introduction, let’s dive into the Data Flow of our application. The architecture essentially gives you the birds-eye-view of our tool using the AWS Infrastructure
The Right Tools
We could have just performed every action, from start to end on just one server, and that’d be it! When designing a data pipeline that is the core component for almost every product, we need to start looking at the very basics of Data Engineering
For something that is a product and will be eventually used by a large audience, these 3 rules become essential from a technical standpoint
- Cost-Efficiency: Is there a cheaper way to do it, without compromising the quality?
- High Availability: If one of the server crashes, so will the entire product?
- Scalability: Can we make the tool handle peak loads on its own?
Even if your tool is just another MVP, not abiding by those 3 rules could become a costly mistake for your product. Hence, the AWS Cloud
While AWS has a broad set of tools, it becomes all the more reason to choose them wisely. Following is a list of AWS tools we’d use to develop our tool where most of these tools are covered under AWS Free Tier. Though, at some point, your usage may get charged. I’d advise you to keep an eye on the pricing before you begin to implement it alongside.
- S3: Simple Storage Service. Cheapest storage you can get
- EC2: Compute Server. t3a.xlarge instance
- DynamoDB: NoSQL Database
- Lambda: Compute service to handle small script executions at scale
- AWS API: A good choice because it’s hard to write a scalable API service
Setting Up The Infrastructure
You may make use of the code available at GitHub to make your Infra functional right away!
Github: https://github.com/purijs/kaldi-asr-aws
Please refer to the README.md file on Github, it has a detailed explanation on how to set everything up on your EC2 Instance.
You’re free to choose any kind of EC2 machine. However, I found the following configuration sufficient to implement this pipeline
- EC2: t3a.xlarge
- 50GB Disk Space
- Image: Amazon Linux 2 AMI (HVM)
- Security Groups: Open Port 80 (HTTP), 8080 (FLASK)and 22 (SSH)
You may incur costs at this point since this type of EC2 instance is not included in the Free Tier. If you’d anyway procure it, make sure it is in stopped state as we won’t be using it right away
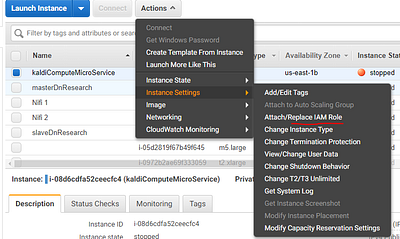
Go ahead and procure your EC2 instance with the above configuration and clone the above Git Repository into your server. Once you have this set up ready, we’ll be going through the following steps on the AWS Console
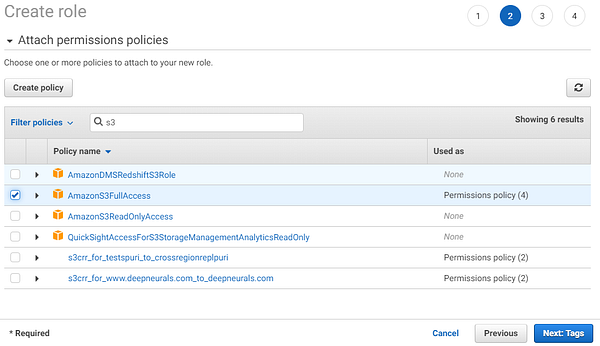
- Make an IAM Role with S3 read/write access and attach it to your instance
- Make an IAM Role for Lambda function to read/write to DynamoDB
- Configure S3 Bucket
- Write first lambda function to read the metadata of an audio file
- Set up AWS API to trigger our first Lambda Function
- Configure EC2 Instance with the Kaldi ASR (Clone git code at this point!)
- Write second lambda function to read/write transcripts into DB
- Setting up DynamoDB
- Linking the pipeline with a Flask App
THE PRACTICAL
- Making the IAM Role for S3
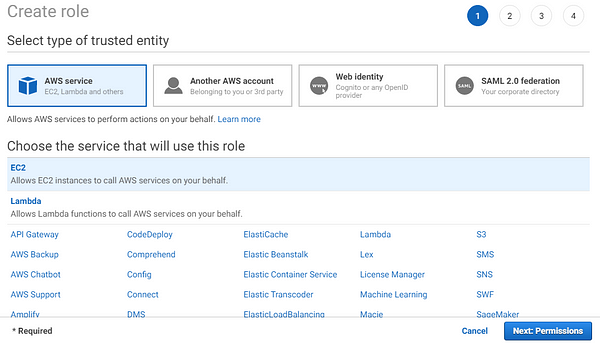
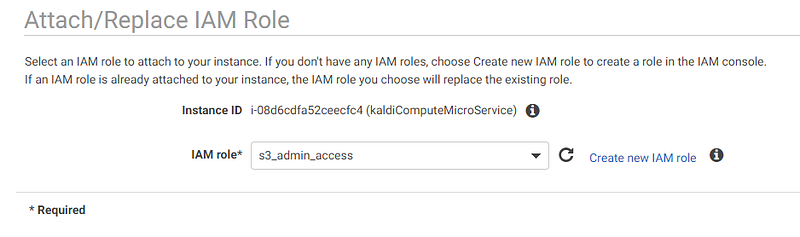
Now you can run “aws s3” CLI commands and access S3 Buckets from your EC2 without having to use/store account secret keys
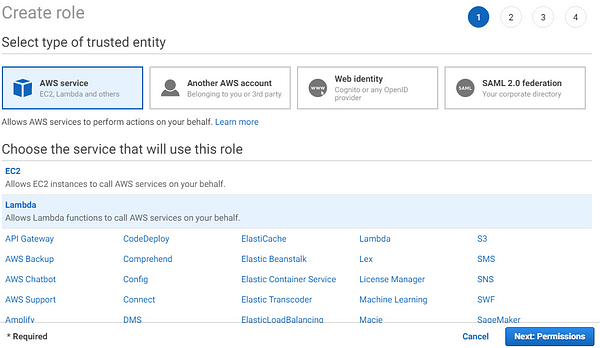
2. Making the IAM Role for Lambda Functions
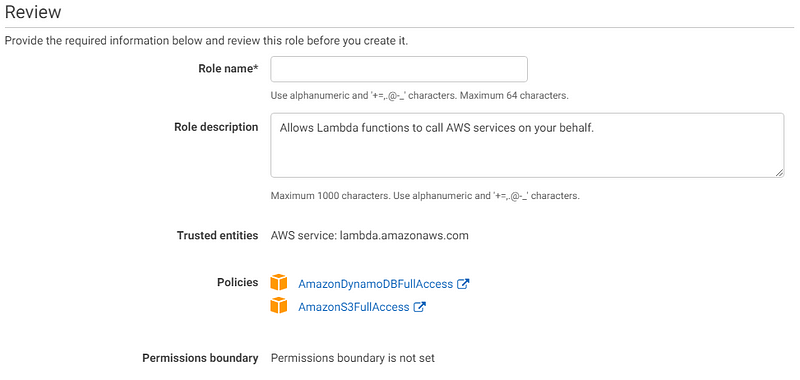
[UPDATE] : In addition to the above two policies, add these as well:
- CloudWatchFullAccess
- LambdaFullAccess
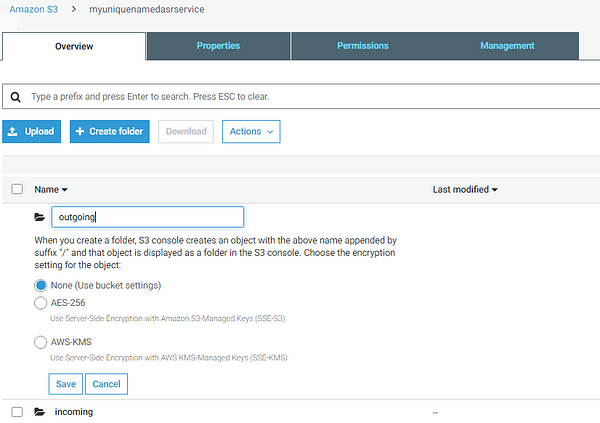
3. Configuring the S3 Bucket
Now, we’re done with setting up the necessary access rights for our different AWS services, it’s time when we set up our first service i.e. S3
Purpose:
Our S3 bucket, which is nothing but AWS’s storage service, will have 2 directories i.e. Incoming & Outgoing
Incoming: Store audio files uploaded by users, will be removed once processed by EC2
Outgoing: Stores transcripts of the audio .txt file which is later read by a Lambda function which then dumps the content into DynamoDB

4. First Lambda Function
To put it briefly, AWS Lambda allows you to run Python/NodeJS/Bash/etc. code just like you’d run on your EC2 machine. The Only difference being, apart from some technical ones, you’re charged only when this code runs i.e for every trigger and also, it scales well!
This lambda function will run a Python code that will read the file names stored in S3 and dump them into DynamoDB.
This is step 5, 6 and 7 in reference to the architecture diagram
Note how we are decoupling the components wherever possible
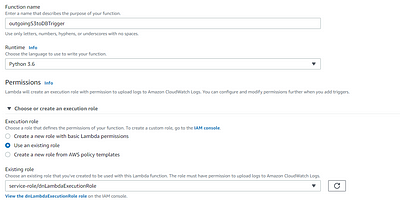
Choose “Lambda” from the AWS console’s Services section. Make sure you’ve selected “Author from Scratch” box


If you scroll down a bit, you’ll see an integrated code editor with some dummy python code. Go ahead and replace this code from the Git Link below:
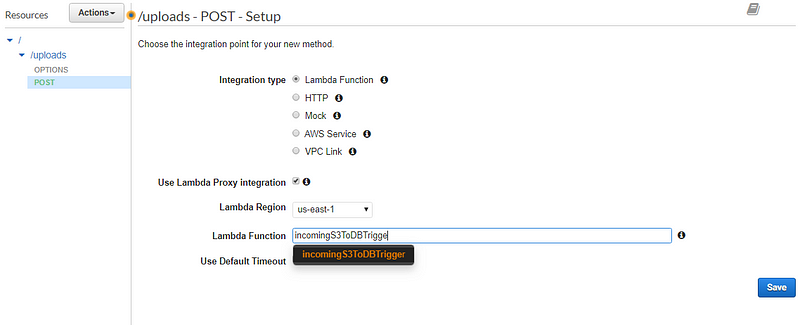
In the next step, we’ll have an AWS API as a trigger for this function.
Since this is the first execution stage in our pipeline, two series of events happen when the user clicks the “Submit” button on our web page.
- Files are uploaded to S3 bucket you created above
- An AWS API is called [POST] where file_names and email of the user is passed as JSON values
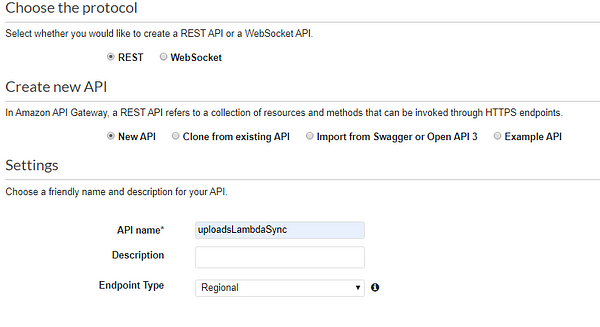
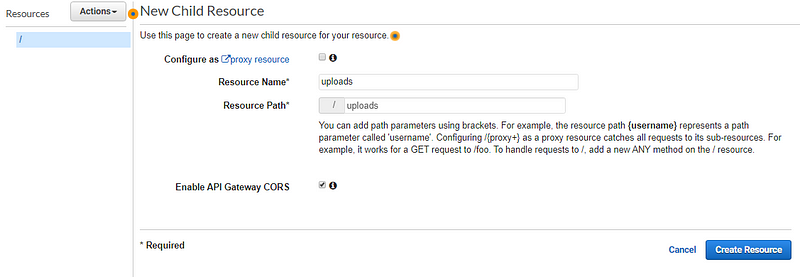
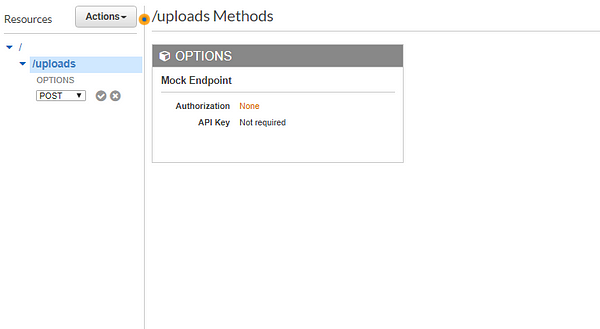
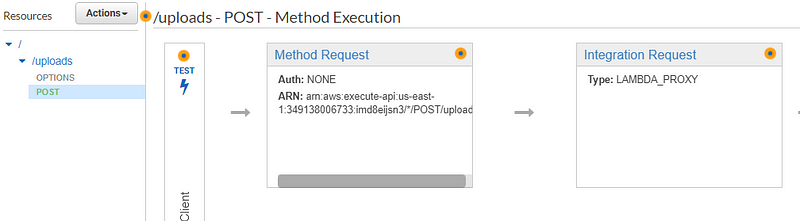
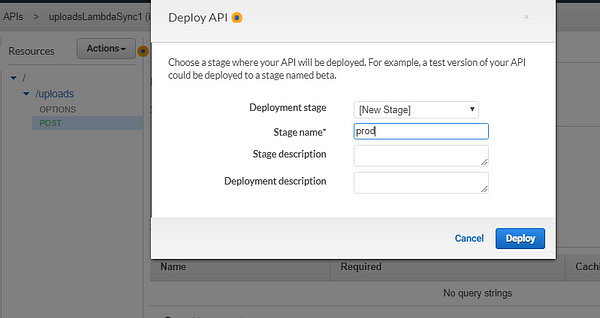
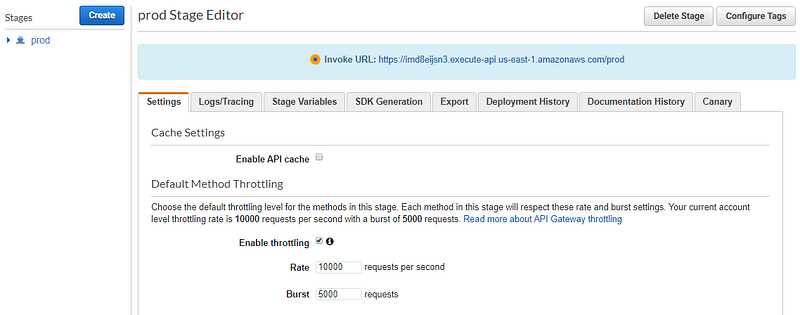
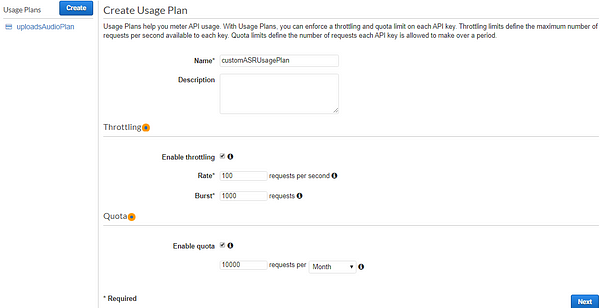
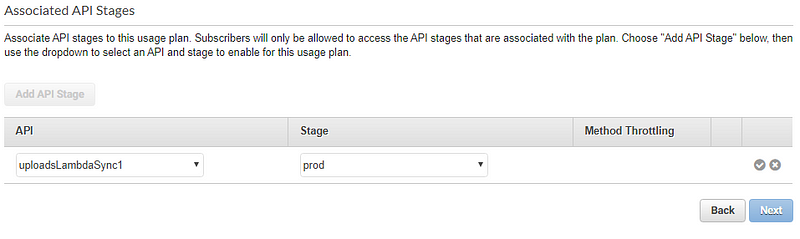
5. Deploying an AWS API
Head over to the API Gateway section from AWS console and follow the screen shared below
A couple more steps…
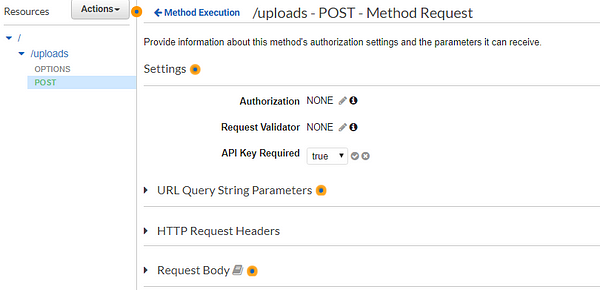
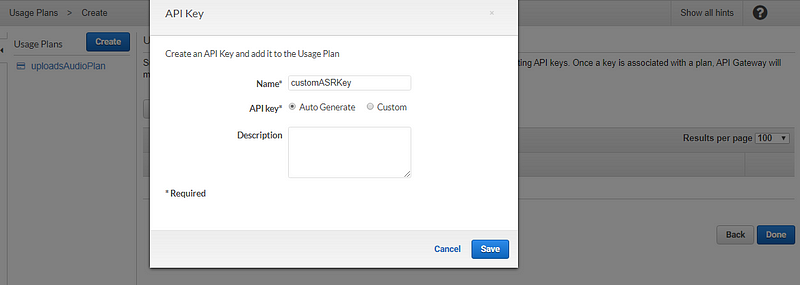
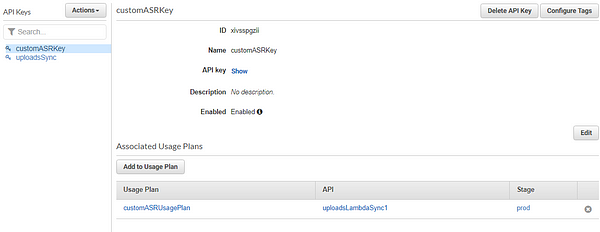
At this point, you’ve configured your API and added it as a trigger to the Lambda function. To make this API secure, so your API doesn’t get exposed or drained overnight, we’ll have to set up an API key as well.
This is crucial as anyone could just keep hitting the API URL, and in no time, your costs could sky-rocket.
That’s it! We’ve now completed the pipeline until the audio files are passed into our EC2 machines
These were steps 3 and 4 in reference to the architecture diagram
Everything you’ve set up on AWS so far will not even cost you a penny because of two main reasons:
- You’re in Free Tier (If you signed up for the first time)
- If not, no problem, the services S3, Lambda, and API are pay-per-use. You won’t get charged unless you use them.
Kaldi ASR
Kaldi is a powerful speech recognition toolkit available as an open-source offering. The toolkit is more or less coded in C/C++/Python languages and also has a very active support/discussion community on google groups. Daniel Povey, founder of this toolkit is the one who’d respond mostly to your queries if you had one.
Just like any ML model, an ASR model can either be trained for your specific language/audio or we can use pre-trained models available on Kaldi’s website
While training a model is out-of-scope of this article, we’ll make use of an English Trained Neural Network Model. For all the neural network enthusiasts, a typical ASR model has the following training params:
- ~ 10 Epochs
- ~ 10 to 13 hidden layers with 1024 dimensions each
The pre-trained model used in our scenario has a WER (Word Error Rate) of 15.6%, meaning, an accuracy of 85% approx.
ASR Decoding
Let’s quickly understand how does our ASR model actually understands the audio and then can form meaningful sentences. An ASR decoding makes use of multiple resources that were fed into it while training, like:
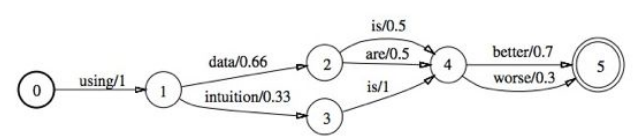
- Lexicon: List of words with their respective phonemes, to map audio frequency with a phoneme. A group of phonemes make up a word
- Ngrams: Lots of them go up to 4-grams, to predict next possible word
- WFST: Weighted Finite-State Transducer: To combine phonemes and words and form sentences
- A lot of Maths!
While there are a lot of models that Kaldi has to offer, like, Monophone, Triphone, SAT Models but the Chain(Neural Net) models significantly outperform others.
We’ll be using Kaldi’s ASpIRE Chain Model with already compiled HCLG. This is included in model.zip file on Github
THE PRACTICAL
Let’s quickly get back to our LAB work and implement this highly-complex piece of work in a few easy steps. At this point, you should have your EC2 up and be SSHed into it.
Please refer the Github Repository for any missing resources/links
- In your home directory [/home/ec2-user], maintain the following directory structureD -> Represents Directory
F -> Represents Filecd /home/ec2-user/-audios D [ Files from S3 will be synced here ]
-audiosKaldi D
-processing D [ Files ready for Transcription are moved here ]
-sendWavToProcess.sh F
-kaldi D
-Dockerfile F
-models D
-model.zip F (unzip here)
-transcriptMaster.sh F
-transcriptWorker.sh F
-output D [ Transcription in .txt file will be store here]
ffmpeg F
getConvertAudios.sh F
uploadOutput.sh F
A list of commands to get you started quicklymkdir audios kaldi models output
mkdir -p audiosKaldi/processingwget -P /home/ec2-user/ https://johnvansickle.com/ffmpeg/releases/ffmpeg-release-amd64-static.tar.xztar -xvf ffmpeg-release-amd64-static.tar.xzmv ffmpeg-4.2.1-amd64-static/ffmpeg ~/
sudo chmod 755 ~/ffmpegwget -P /home/ec2-user/models/ https://crossregionreplpuri.s3.ap-south-1.amazonaws.com/model.zipunzip /home/ec2-user/models/model.zip -d /home/ec2-user/models/sudo yum install -y git
sudo yum install -y docker
sudo service docker start
alias docker='sudo docker'
2. Next, we need to make an entry in crontab
Crontab will run some of our scripts automatically at fixed intervals.crontab -e# PASTE THESE 2 LINES*/1 * * * * sh ~/getConvertAudios.sh
*/2 * * * * sh ~/uploadOutput.sh
3. Kaldi is Strict
The properties of the audio files that were given as input while training the model need to be maintained while testing it on new data as well. In our case as well, Kaldi will accept a very specific format of the audio file, mainly
- .wav Sound File
- 8000 bit-rate
To make sure we have the correct format every time, since, the user can upload any kind of audio file, we have used ffmpeg to convert the audio files.
Some information about the shell scripts in usegetConvertAudios.sh -> This script syncs files from S3 into audios/ directory and using ffmpeg converted and stored into audiosKaldi/uploadOutput.sh -> This script syncs the .txt files in output/ directory into S3 bucketsendWavToProcess.sh -> This script limits the number of files for processing to the number of cores on the VM for parallel processingtranscriptMaster.sh -> This script calls transcriptWorker.sh for every audio file placed in the processing folder and ensures at any time only #no. of cores amount of files are runningtranscriptWorker.sh -> Where the magic happens, actual transcription happens through this file.
4. Setting up the Kaldi Docker
We need to build the Kaldi Image using the Dockerfile, this means installing required dependencies for Kaldi to run.cd kaldi/
docker build -t kaldi . &
This could take up to an hour, so it’s time for a cup of coffee!
Once this is done, run this command to start the Kaldi containerdocker run -d -it --name kaldi -v ~/models:/models/ -v ~/audiosKaldi/processing:/audios/ -v ~/output:/output/ kaldi bash
Finally, we need to start sendWavToProcess.sh script so the script can keep sending the files to Kaldi containercd /home/ec2-user/audiosKaldi/
sudo chmod 755 sendWavToProcess.sh
./sendWavToProcess.sh &# Ignore any errors you see on your terminal
Make sure you have updated your bucket names in these files:getConvertAudios.sh
uploadOutput.sh
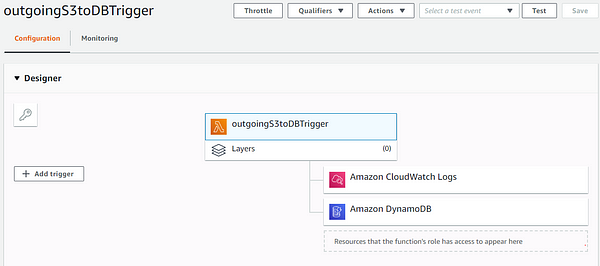
5. Second Lambda function
Since DynamoDB support dynamic schema, meaning we can create new fields/column in the DB on the fly, this function will update the current records in the DB and add a new column by the name transcript
If you remember, we created two folders Incoming & Outgoing, in our S3 bucket. The output i.e. text files are stored in the Outgoing folder. Our new lambda function will be just like our first, the only difference being the trigger point.
At any time, a .txt uploaded/created in the s3://bucketname/outgoing folder, the lambda function will be fired

The Python Code for this lambda functions is available here:
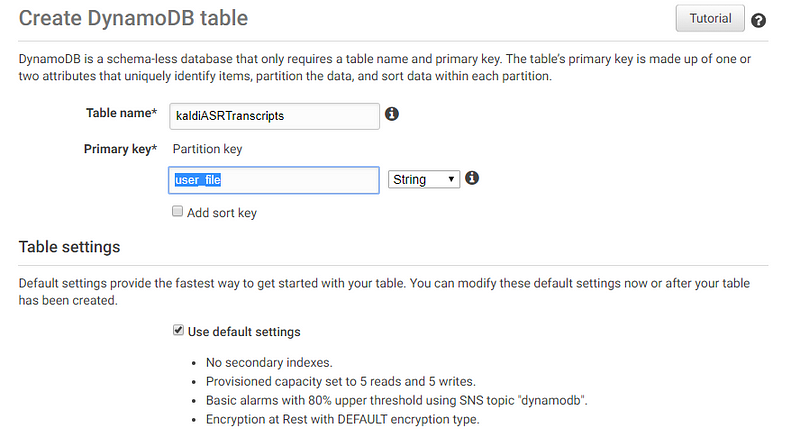
6. DynamoDB: One-Click DB Set up
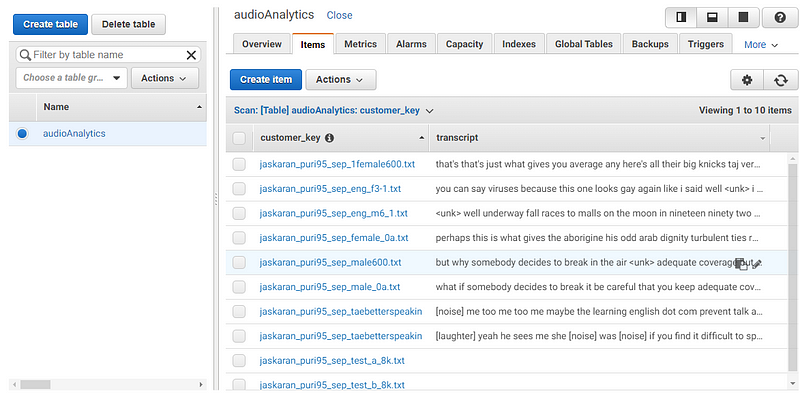
Head over to DynamoDB from your AWS console and create your first Table. Set audioAnalytics as your Table name or change the name in code of both the Lambda Functions
7. Finally, the Web Interface
Our web application is just another Flask App, you may want to check out the Github link on how to set up/install Flask/Python on EC2 servers.
Once you are in the virtual environment, although not recommended for a production workflow, you can simply clone the flask-app directory into your working directory, for e.g: /var/www/html/python app.py &
This will run the flask application in background.
In browser, type your EC2’s IP with 8080 as port number
http://<YOUR IP>:8080/
In the textfield, type a valid email and then upload .wav/.mp3 audio files
On running the following two commands, Kaldi will start transcribing the audio files once they are in the /home/ec2-user/audiosKaldi/processing folderdocker exec -it kaldi bash# Once you can see some files in the /audios/ folder, run:
/models/transcriptMaster.sh
Feel free to reach out or post your questions/feedback down here, as I’m sure this is a lot of Practical Stuff and usually doesn’t go well in the first attempt!

Comments ()